Updated 26th of March 2025
SayIntentions.AI Client
-
User Guide
TABLE OF CONTENTS
- Installing the SayIntentions.AI Client
- Starting the SayIntentions.AI Client
- Main window
- Client Settings
- Pilot Portal Settings
Installing the SayIntentions.AI Client
Download the latest version via the Pilot Portal > Download > Main Application
Once the download completed, extract the installer from the .zip file
Double-click “sayintentions_install.exe” and follow the installation process
Additional information:
The default installation path is “%appdata%\SayIntentionsAI”
The settings are located in “%localappdata%\SayIntentionsAI”
/!\ Notice the difference between “%appdata%” and “%localappdata%”
%appdata% will resolve to “C:\users\<your_username>\AppData\Roaming”
%localappdata% will resolve to “C:\users\<your_username>\AppData\Local”
X-Plane Users : There is a VR Panel available for download on the Pilot Portal > Download
MSFS Users : With the SayIntentions.AI Client installation, there are a few packages that are installed (via symbolic links) in the Community Folder

sayintentions-efb
→ <SayIntentionsAI_Install_Directory>\efb\sayintentions-efb
sayintentions-fly-in-library
→ <SayIntentionsAI_Install_Directory>\fly-in-objects\sayintentions-fly-in-library
SayIntentions-SimObjects-Optional
→ <SayIntentionsAI_Install_Directory>\simobjects\SayIntentions-SimObjects-Optional
SayIntentions-VR-Toolbar-Plugin
→ <SayIntentionsAI_Install_Directory>\toolbar\SayIntentions-VR-Toolbar-Plugin
Starting the SayIntentions.AI Client
Note for X-Plane users : you need to start the SayIntentions.AI Client only after getting in your aircraft cockpit. However, you need to run the SI Client once BEFORE opening Xplane after the initial Client install and after each update to install the Taxi Arrows plugin.
Other simulator users can start the SayIntention.AI Client before starting the sim/getting in the cockpit.
Simply double-click the SayIntentionsAI shortcut on your desktop to launch the application.

Main window
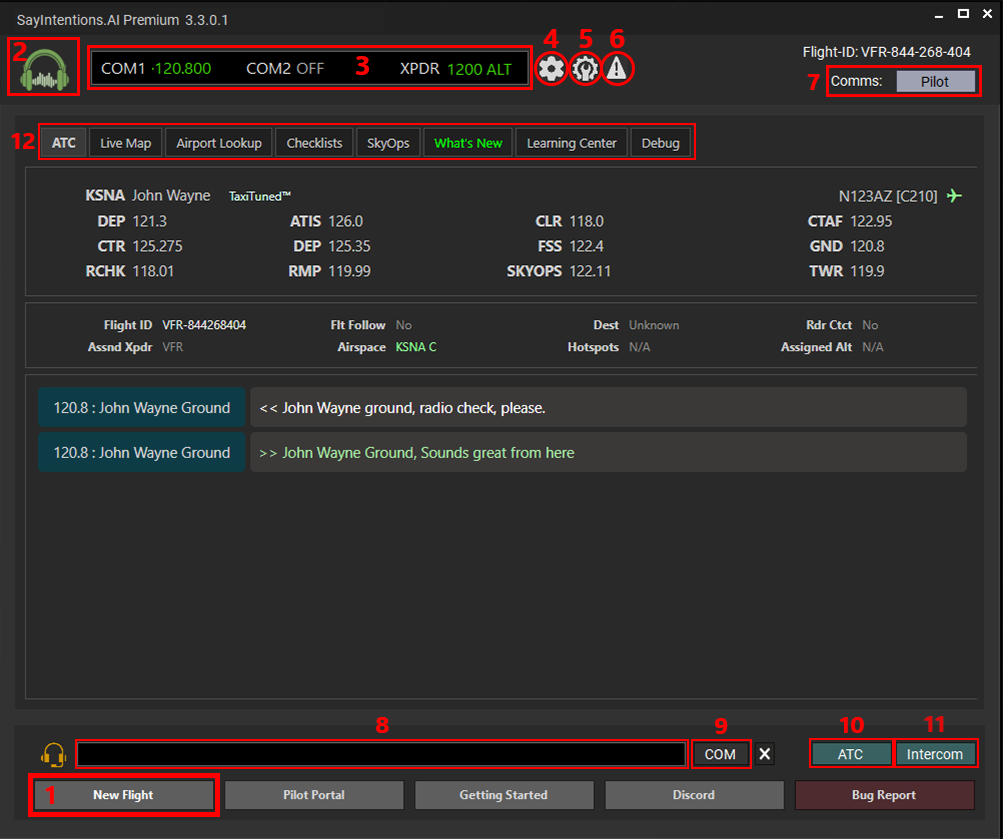
1) New Flight: The most important button, make it part of your “sim startup checklist” to Press this button so the SayIntentions.AI network knows you’re starting a new flight (otherwise, the AI may try to resume your previous flight and we don’t want that).
2) SayIntentions.AI logo: Indicates if you are successfully connected to the SayIntentions.AI network (logo is green) or not (logo is grey).
3) Radios: You can see the frequency to which each radio in your aircraft is tuned, as well as the squawk code and mode your transponder is set to.
4) SI Client Settings Cog: Access the SayIntentions.AI Client settings by clicking this wheel cog. Settings are detailed in the II. Settings section.
5) Pilot Portal Settings Link: Click this to access the Pilot Portal Setting Page where MOST settings are now located.
6) Bug Report Link: If something goes wrong during your flight, click this button to submit a quick bug report. This not only allows you to describe your issue, but also attaches a complete snapshot of your flight-data at the time the issue occurred. Please describe when this bug occurred during your flight.
7) Comms: The Comms button allows you to switch the communication handling to your copilot (or take it back as pilot).
Note 1 : It may take a few seconds for the switch to happen (and the label changing from Pilot to Co-Pilot)
Note 2 : You can also simply ask your Co-Pilot over the Intercom to handle the communications (“Can you handle the comms please?”)
8) Input Box: Instead of using your voice to communicate with ATC or Crews, you can simply type the message you wish to send to ATC or Intercom 1/2/3 in this Input Box.
9) Channel Selector: Cycle through this button to select the destination of the message typed in the Input Box (COM, Icm1, Icm2, Icm3)
10) ATC: The ATC button is black when disabled, dark green when enabled (you’ll hear and be heard when communicating with the ATC) and goes bright green when transmitting. Clicking on this button will turn ATC communications on/off.
11) Intercom: the Intercom button is black when disabled, dark green when enabled (you’ll hear and be heard when communicating over the Intercom) and goes bright green when transmitting. Clicking on this button will turn the Intercom on/off.
12) Tabs :
ATC
1st section: Shows the nearest airport frequencies
2nd section: You will find some flight information once connected to the simulator about your ongoing flight
3rd section: ATC comm history for the flight
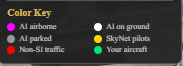
Live Map
Live Map showing aircraft by color
Airport Lookup
Lookup frequencies, weather and runway information by entering the airport ICAO code
In the drop down box, your Departure and Destination airports will be shown once you have obtained a valid IFR clearance. You can also choose OTHER and enter an ICAO code for an airport not in your current flight plan or the drop down list
Checklists
You will see the relevant checklists for your currently selected aircraft if any are available
SkyOps
SkyOps Mission Control
What's New
This tab contains the change log of the most recent changes both in the Client and on our Neural AI servers
Learning Center
New user of SayIntentions or ATC as a whole? Learn here what to do and say.
You can print out a copy of our Quick-Reference PDF's in the Start Here Section!
Debug
Here you can see information pertaining to your current flight
Client Settings
General

Account:
Fill in the two fields; Email and Password with your SayIntentions.AI account details
These are the same credentials you use to access the Pilot Portal (https://p2.sayintentions.ai/login_p2/)
You can reset your password in the Pilot Portal by clicking on your User Name in the top right, then choosing Reset Password and filling in the form that opens.

Misc:
Always On Top : the SayIntentions.AI window will always remain visible
This will NOT allow other windows to overlay it.
Clicking on the App Data Folder button will take you to the folder where the Client settings are saved. You should not normally need to access this folder
Connection
Primary Server: The main & stable SayIntentions.AI server (recommended)
Experimental Server: The server with upcoming and unstable features, access only allowed after being a subscriber for 60 days or more
Development Server: Please enable this only on request from the SayIntentions.AI developers
Headset

Primary Audio:
Select the Output devices where you want the COM (ATC) audio and Cabin Audio to be played
The Test button will play a sample audio clip through the selected output device
The Cabin Audio output device can be overridden on a per channel basis in the Intercom Speakers Section below.
Select the Microphone device you wish to use to talk to ATC and the Intercom channels
The Start button will record a short clip thorough your selected microphone device, then press STOP and it will play back your recording.
The Play button will play back the recorded audio again to test how your voice sounds.
Volume Controls
COM1: volume level for the COM1 frequency
COM2: volume level for the COM2 frequency
Cabin: volume level for the Cabin Audio sounds
Squelch: Intensity level of the Ground Loop and Squelch effects
Reduce Chatter Volume: Check this option if you want other aircraft ATC to have a lower volume when they play on the frequency
Intercom Speakers
Click the Channel (1, 2 or 3) you wish to set the audio output device for.
To Pilot: Choose the desired output device and the associated volume when this passenger will talk to you
To Passengers: Choose the desired output device and the associated output volume when this passenger will talk to the cabin, this option is merely for the Cabin Crew announcements to the passengers.
Test: will let you hear how the Intercom sounds on the desired output device
Controls

Here you can assign any desired binding to the available events:
Select the desired event in the “Auto-Assign / Step 1: Choose Event” dropdown
Ignore the “Manual Assign” box
Press the desired button on your peripheral to bind the button
The binding should appear in the list of assigned controls
To remove an assigned control, highlight it in the list then press the “-” symbol in the “Manual Assign” box
You can have multiple inputs bound to the same Event
The main events you should be looking for are :
COM Radio PTT : the button you wish to Push To Talk (PTT) to the ATC
Intercom PTT Channel 1, 2 or 3: the button you wish to Push To Talk (PTT) to the Intercom Channel 1, 2 or 3
Pilot Portal Settings
MOST settings have now been moved to the Pilot Portal Settings page:

General:
SimBrief:
Input your Username or UserID, found in your Account Details on SimBrief (https://dispatch.simbrief.com/account)
Username :
UserID :
Audio Effects:
- Squelch Tail Effect: The typical noise made when transmitting and receiving via radio. You can adjust the level of the Effect in the Settings-Headset tab of the SI Client.
Ground Loop Effect: Ground loops are a major cause of noise, hum, and interference in audio, video, and computer systems. (see wikipedia)
General Settings:
ATC Language: Selecting anything other that English will make ATC speak that language AND configure the speech-to-text to best understand that language.
Time Zone: This will ONLY change the time displayed in your flight logs.
Pilots Name: Enter the name you want ATC to refer to you as
Pilot's Gender Phrase: Set this to be referred to by ATC as either "Sir" or "Ma'am"
Co-Pilot's name: Enter the name you want ATC to refer to your co-pilot as
Checklist Preference: Choose between Normal and Full Auto checklists as the default selection


Audio:
These settings are in the SayIntentions Client Settings
Controls:
These settings are in the SayIntentions Client Settings
Aircraft Callsign:
Use Simbrief:
If this option is checked, the Callsign defined in your SimBrief flightplan will be used instead of the option selected in either “Aircraft Model/Tail Number” or “Airline ICAO and Flight Number”
THIS WILL OVERRIDE ALL SETTINGS BELOW!!!
Aircraft ICAO
Auto: This setting will load the Aircraft Type from the SimBrief flightplan.
Custom: Set, or choose from the drop down list, your aircraft ICAO Type if SayIntentions.AI cannot retrieve your aircraft ICAO Type from your simulator
recommended for MSFS users : <Auto>
X-Plane users leave on <Auto> unless your aircraft is not correctly detected
Aircraft Model / Tail Number
IMPORTANT: The fields cannot be left BLANK
These fields are used as the default identification for your aircraft.
Aircraft Callsign: usually the callsign associated with your aircraft make
Tail Number: the tail number of your aircraft
Color: an identifier that may be used at a later time
Click "Auto” to automatically generate the Long and Short Callsign from your “Aircraft Callsign / Tail Number” defined previously
Airline ICAO and Flight Number
Define here the default Airline ICAO and Flight Number you want to be called, overriding the information entered in “Aircraft Model / Tail Number”
THEN, select your default callsign by selecting the round button option between “Aircraft Model/Tail Number” and “Airline ICAO and Flight Number”
Traffic Injection (MSFS2020/2024 only):
Radio Chatter: Set the level of additional historical radio chatter
Traffic Injection Settings: Set the levels of Commercial and GA injected traffic density
Disable AI Radio Chatter from Injected Traffic: turns off the audio from injected traffic
Intercom:
Sets the Passenger Type (Cabin Crew, Co-pilot, etc), Passenger, and language for each of the Intercom channels (1, 2 and 3)
Multiplayer (MSFS2020/2024 only):
Enable SkyNet Aircraft
- Other user aircraft will be injected into your sim, with model and livery matching!
The model and livery matching is done against MSFS default traffic, FSLTL, AIG, IVAO and FS Traffic models, at random if all sources are installed
Other users must have also enabled SkyNet for you to have their airplane injected in your simulator.
Enable SkyNet Audio
You will hear other pilots also using Skynet
Enter a SkyNet Group Code to only see other group members injected aircraft.
This also works with AI traffic injection but limits Skynet aircraft to only members using the same group code
Share Audio
Check this option to allow your ATC communications to be heard by other pilots
Realism:
Auto Tune:
Auto-Tune Standby Frequency: When ATC instructs you to contact a new frequency, that frequency will be set in COM1 STANDBY, you only need to swap it to ACTIVE
Auto-Tune Transponder
Runways
Handoffs
Sequencing
Other
Cabin Crew:
Cabin Crew and Cabin Crisis settings
Virtual Airline:
Set your Virtual Airline along with custom ICAO and Callsigns
SkyOps:
Set your SkyOps mission and dispatch settings
VR:
Set the VR font size for the in-game panel here.
This is only for MSFS 2020 and 2024 users, Xplane uses a VR plugin currently found as a pinned comment in the premium-xplane channel of the SayIntentions Discord
Misc:
Weather: Choose your weather source between Live Weather, 24 Hour Historical (MSFS 2024 only)
Aircraft Systems: Disable Auto-Sync of your tail number with the simulator (MSFS only)
Taxi Assist: Set your preference for Progressive Taxi options
Persona:
Crowd Voice:
Integrations:
Link Your Account: Connect your Discord, Navigraph and Flightline SMS accounts here
OnAir Integration: Configure your OnAir company integration settings here
Preview (available only to members of the SI Partner program):
As new experimental features are introduced, SI Partners get the first change to preview and use them. Opt-in to any features available to Partners only on this page
Experimental:
Various features for our more experienced users. Please feel free to use them as you wish.
*** If you run into issues using any of these features, remember the warning at the top of the page and please DISABLE the features and verify there is still a problem BEFORE asking for support! ***
Privacy:
Control how your data is stored and used with these settings.
***NOTE IF YOU DELETE YOUR ACCOUNT IT WILL BE UNABLE TO BE ACCESSED ANYMORE!***
Was this article helpful?
That’s Great!
Thank you for your feedback
Sorry! We couldn't be helpful
Thank you for your feedback
Feedback sent
We appreciate your effort and will try to fix the article